
再進行任何修改設定檔的動作時,別忘了先將原本的設定備份起來。
 |
| 想了解為什麼有人的CFG檔案可以這麼多嗎? |
當你有一天可能換了一台新電腦,或者是你需要常常使用到不同的電腦,如何同步化你的個人設定一直以來都是棘手的問題,你可能只是想要Just for fun,換了台電腦,反正只要進入遊戲慢慢的手動調整設定沒有什麼大不了的,甚至是跟你已經習慣已久的設定有些許誤差也沒關係,不過你有沒有想過,那些Play Competitively的業餘玩家或者是靠遊戲吃飯的職業玩家,可能有更多的機會東奔西跑參加LAN party,他們有可能在短短的準備時間忍受一而再再而三的調整設定嗎?
 |
| 別開玩笑了,我一定要自己慢慢把這麼多設定搞定才能玩嗎? |
答案是肯定的,只要把設定的工作丟給電腦來做,省下的時間你可以盡情練習,省下的力氣甚至可以準備練習接下來要面對的比賽,這就是為什麼許多職業玩家選擇用CFG來客製化自己的遊戲環境,他們所需要做到的動作只不過是在賽前先把自己的CFG打包好,到了場地再解壓縮而已。
那麼,什麼是CFG?要怎麼使用呢?或者是說,再使用之餘,要怎樣更有效率的使用呢?
在這裡,我就使用我的CFG來做解說。
●什麼是CFG?●
CFG為configure的縮寫,一般來說中文可以叫他設定檔,顧名思義是存放設定的檔案,如同其他程式設計碼一樣,檔案可以用記事本開啟,裡面是密密麻麻的程式碼,只不過在這裡程式碼的樣子就是遊戲中的"指令"
 |
| 這裡可以輸入的指令,都可以寫入CFG |
●CFG的兩個骨幹 - autoexec.cfg 與 職業腳本●
那麼這些CFG是怎麼運作的呢?在眾多CFG中你可以發現一個檔案名稱為autoexec.cfg的檔案,依檔名你可能已經發現這個檔案可能會自動執行,沒錯,如果你的CFG裡面有這個檔案的話,在遊戲執行之後會自動去跑autoexec.cfg裡面的程式碼,如此一來你可以把想要的指令全部寫在裡面,遊戲終究還是個程式,所有的設定部分都是由指令構成的,不論是你的鍵盤設定、滑鼠設定、準星設定、畫質設定等等亦同,將這些相關的指令全部寫入autoexec.cfg裡面,"基本上"就已經達到設計屬於你自己環境的概念。
好奇指令都存放在什麼地方嗎?如果從來沒有使用過指令來設定你過的環境,並且想要知道自己手動調整個設定轉換成指令是什麼樣子的話,答案是這些在遊戲中手動調整的設定都存放在config.cfg裡面。
 |
| 這堆密密麻麻的東西真噁心 |
如果你是第一次開啟config.cfg,有可能會嚇到,沒錯,存放指令的方式非常雜亂無章,如果想要從這裡慢慢設計自己的設定想必會花上好幾天的時間。你也可以把這些指令全部複製貼上到autoexec.cfg,但是這只是"基本上"有達到設計屬於自己環境的概念,如何"更有效率"的設計CFG才是重點。
而職業腳本是Valve另一個貼心的設計,其實就是給了每個職業有個別的設定空間,當你更換職業的時候,會自動在背後去跑該職業的CFG。例如在我的scout.cfg分成三部分你可以看到
scout.cfg================================================================================================================
exec crosshairswitcher/switcher; scout
(執行準星交換器)
bind SPACE +dj
(令空白鍵蹲跳)
bind w +mfwd
bind s +mback
bind a +mleft
bind d +mright
(另WSAD為無衝突移動)
==============================================================================================================================
這幾條指令,其功用在後面會做解說,都是一些可以增進遊戲性的指令
●為什麼一直提到"更有效率"的設計自己的CFG?●
有程式設計背景的人大概都知道,初學者在學習程式設計的時候,所學習的程式幾乎都是單一的程式,當程式設計的難度越來越深、程式碼越來越長的時候,把所有的程式碼都寫在一個程式裡是非常不明智的選擇,在日後的維護上有多麼的不便可想而知,所以這裡會運用到"主程式"與"副程式"的概念。
所謂的主程式即代表此程式扮演"執行者"的角色,有點像是汽車踏板的概念,當汽車會動時,並不是因為你踩了汽車踏板這麼簡單,而是因為你踩了汽車踏板而驅動了汽車內部的功能使汽車移動。
而副程式就代表了會使汽車移動的那些功能,在這裡副程式可以有很多個,而主程式只有一個。
所以你的鍵盤設定、滑鼠設定、準星設定、畫質設定等等都可以分門別類的撰寫,這樣日後維護既方便又一目瞭然,而autoexec.cfg的角色就只剩下執行鍵盤設定、滑鼠設定、準星設定、畫質設定等等的"執行者",與存放其他需要記憶功能(如啟動選項、共同指令)的地方
概念解說完了,就直接來看我的autoexec.cfg裡面有些什麼東西
autoexec.cfg============================================================================================================
//-novid -nosync -nojoy -noforcemparms -noforcemaccel -noforcemspd -w 1680 -h 1050 -dxlevel 81 -heapsize 1966080 -windowed -noborder
(使用註解存放啟動選項指令)
//-heapsize: Dedicates a specific amount of memory to Source.
//Increasing the allotted memory can yield substantial performance gains. However, it is important that you dedicate the right amount of memory. //Dedicating too much or too little could actually cause a performance decrease.
//It is recommended you dedicate half of your system memory. Below is the recommended usage:
// * 512MB System Memory: -heapsize 262144
// * 1GB System Memory: -heapsize 524288
// * 2GB System Memory: -heapsize 1048576
(使用註解存放-heapsize的解說)
//duckjump
alias +dj "+duck;+jump"
alias -dj "-jump;-duck"
(蹲跳指令的設計碼)
// Null-cancelling movement script
// (prevents you from pressing two opposing directions, which causes you to stop moving)
alias +mfwd "-back;+forward;alias checkfwd +forward"
alias +mback "-forward;+back;alias checkback +back"
alias +mleft "-moveright;+moveleft;alias checkleft +moveleft"
alias +mright "-moveleft;+moveright;alias checkright +moveright"
alias -mfwd "-forward;checkback;alias checkfwd none"
alias -mback "-back;checkfwd;alias checkback none"
alias -mleft "-moveleft;checkright;alias checkleft none"
alias -mright "-moveright;checkleft;alias checkright none"
alias checkfwd none
alias checkback none
alias checkleft none
alias checkright none
alias none ""
(無衝突移動的設計碼)
echo
echo "+-+-+-+-+-+-+-+-+-+-+-+-+-+-+-+-+-+-+-+-+"
echo "+-+-+-+-+-+-+-+-+-+-+-+-+-+-+-+-+-+-+-+-+"
echo "autoexec.cfg loaded |"
echo "+-+-+-+-+-+-+-+-+-+-+-+-+-+-+-+-+-+-+-+-+"
echo "+-+-+-+-+-+-+-+-+-+-+-+-+-+-+-+-+-+-+-+-+"
(在遊戲中的指令區回報這些字串)
exec otherbinds.cfg
exec settings.cfg
(執行otherbinds.cfg與settings.cfg這兩個檔案裡面的指令)
==============================================================================================================================
在這裡直接告訴幾個保留字的功用:
//:註解,在這兩個斜線後面的的所有字詞都會被忽略,所以可以在這兩條斜線後面打上任何你想要的東西,例如解說
echo:在echo後面的字串會在遊戲執行後在指令區呈現。用意是讓程式回報字串以辨認是否有跑到該程式。
 |
| 就像這樣 |
exec:執行,程式會執行在exec後面的檔案中的指令,例如exec otherbinds.cfg會執行otherbinds.cfg裡面的指令。
各位可以發現autoexec.cfg裡面其實沒有甚麼東西,因為autoexec.cfg就只是一個執行者而已,其重要工作就在於執行我的otherbinds.cfg與settings.cfg,跟存放我的啟動選項所要放的指令與兩個我所要在遊戲中需要用到的實用指令,這兩個部份我最後再來解說。
而我的otherbinds.cfg顧名思義擺放了其他除了我在職業腳本有的鍵盤設定。
otherbinds.cfg=========================================================================================================
unbindall
(最上頭放unbindall先消除所有鍵盤設定是因為防止任何鍵盤設定打亂otherbinds.cfg裡的鍵盤設定,然後在往下跑此程式來一一設定我的鍵盤按鍵)
//____________________________________________________________________
// bindings
//
bind "c" "voice_menu_3"
bind "e" "voicemenu 0 0"
bind "f" "lastdisguise"
bind "g" "taunt"
bind "i" "showmapinfo"
bind "l" "dropitem"
bind "u" "say_team"
bind "x" "voice_menu_2"
bind "y" "say"
bind "z" "voice_menu_1"
bind "`" "toggleconsole"
bind "," "changeclass"
bind "." "changeteam"
bind "/" "jpeg"
bind "\" "explode"
bind "-" "disguiseteam"
bind "TAB" "+showscores"
bind "ESCAPE" "cancelselect"
bind "INS" "+klook"
bind "END" "centerview"
bind "PGUP" "+lookup"
bind "PGDN" "+lookdown"
bind "PAUSE" "pause"
bind "ALT" "+jump"
bind "CTRL" "+duck"
bind "F1" "+showroundinfo"
bind "F3" "askconnect_accept"
bind "F5" "screenshot"
bind "F10" "quit prompt"
bind "MOUSE1" "+attack"
bind "MOUSE2" "+attack2"
bind "MOUSE5" "+voicerecord"
bind "MWHEELUP" "invprev"
bind "MWHEELDOWN" "invnext"
echo
echo "+-+-+-+-+-+-+-+-+-+-+-+-+-+-+-+-+-+-+-+-+"
echo "+-+-+-+-+-+-+-+-+-+-+-+-+-+-+-+-+-+-+-+-+"
echo "binds.cfg loaded |"
echo "+-+-+-+-+-+-+-+-+-+-+-+-+-+-+-+-+-+-+-+-+"
echo "+-+-+-+-+-+-+-+-+-+-+-+-+-+-+-+-+-+-+-+-+"
==============================================================================================================================
各位可能會有疑問說WSAD、跳與射擊跑到哪去了,其實這幾個指令我都丟到職業腳本去了,因為我的WSAD並沒有使用遊戲中預設的移動設定而是使用澳洲玩家povohat設計的無衝突移動指令,跳躍亦同是使用指令將跳與蹲綁在一起的蹲跳指令。
最後則是擺放我的畫質與網路參數設定、滑鼠設定、聲音設定、武器模組設定、抬頭顯示器設定等等的settings.cfg
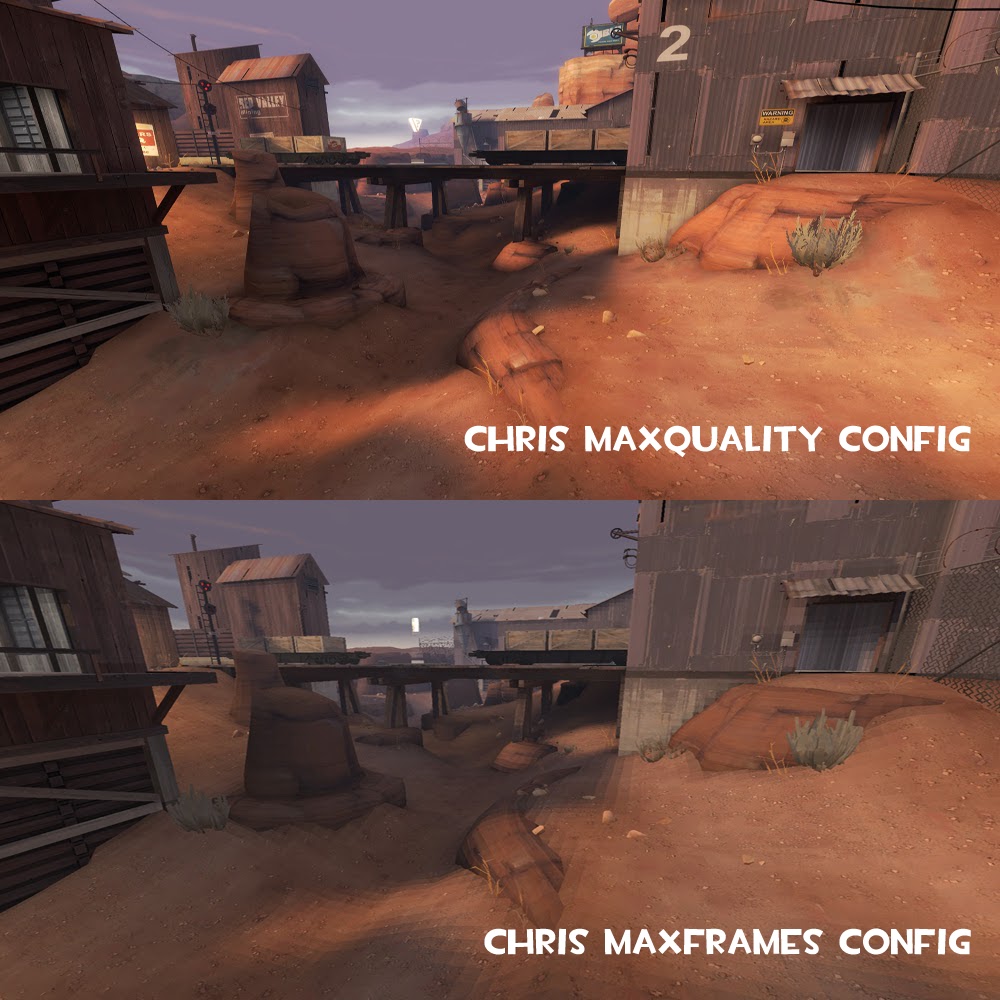
畫質與網路參數設定是參考Chris's Maxframe fps config,什麼是fps config呢?顧名思義是降低畫質效果增進fps張數的設定檔,如果你的電腦不是非常夠力,或者是追求極致的技巧表現不希望任何lag讓你少拿一個Frag,那麼安裝fps config是你最好的選擇,不過換言之得到的就是極低的視覺效果享受,甚至是比遊戲設定手動調整的最低設定還低,畢竟fps config是專門為競技設計利用指令將不必要的效果去除來維持穩定的fps張數,沒有選手想在專心殺敵之餘還去享受旁邊會讓fps張數降低的漂亮風景。
如果你只是想for fun玩個遊戲,並不想把自己的遊戲搞到那麼絕的地步,但是又想利用設計屬於自己環境的概念來設計自己的CFG,Chris也有提供其他CFG,如高畫質的MaxQuality與HighQuality CFG,或者是中等畫質的HighFrames與DX9Frames CFG,不過最多人使用的就是Maxframes CFG,它是目前公認TF2中維持fps張數最好最穩定的CFG,甚至是比前期流行的m0re's fps config統計後平均多出20張fps左右。
各位可以發現autoexec.cfg裡面其實沒有甚麼東西,因為autoexec.cfg就只是一個執行者而已,其重要工作就在於執行我的otherbinds.cfg與settings.cfg,跟存放我的啟動選項所要放的指令與兩個我所要在遊戲中需要用到的實用指令,這兩個部份我最後再來解說。
而我的otherbinds.cfg顧名思義擺放了其他除了我在職業腳本有的鍵盤設定。
otherbinds.cfg=========================================================================================================
unbindall
(最上頭放unbindall先消除所有鍵盤設定是因為防止任何鍵盤設定打亂otherbinds.cfg裡的鍵盤設定,然後在往下跑此程式來一一設定我的鍵盤按鍵)
//____________________________________________________________________
// bindings
//
bind "c" "voice_menu_3"
bind "e" "voicemenu 0 0"
bind "f" "lastdisguise"
bind "g" "taunt"
bind "i" "showmapinfo"
bind "l" "dropitem"
bind "u" "say_team"
bind "x" "voice_menu_2"
bind "y" "say"
bind "z" "voice_menu_1"
bind "`" "toggleconsole"
bind "," "changeclass"
bind "." "changeteam"
bind "/" "jpeg"
bind "\" "explode"
bind "-" "disguiseteam"
bind "TAB" "+showscores"
bind "ESCAPE" "cancelselect"
bind "INS" "+klook"
bind "END" "centerview"
bind "PGUP" "+lookup"
bind "PGDN" "+lookdown"
bind "PAUSE" "pause"
bind "ALT" "+jump"
bind "CTRL" "+duck"
bind "F1" "+showroundinfo"
bind "F3" "askconnect_accept"
bind "F5" "screenshot"
bind "F10" "quit prompt"
bind "MOUSE1" "+attack"
bind "MOUSE2" "+attack2"
bind "MOUSE5" "+voicerecord"
bind "MWHEELUP" "invprev"
bind "MWHEELDOWN" "invnext"
echo
echo "+-+-+-+-+-+-+-+-+-+-+-+-+-+-+-+-+-+-+-+-+"
echo "+-+-+-+-+-+-+-+-+-+-+-+-+-+-+-+-+-+-+-+-+"
echo "binds.cfg loaded |"
echo "+-+-+-+-+-+-+-+-+-+-+-+-+-+-+-+-+-+-+-+-+"
echo "+-+-+-+-+-+-+-+-+-+-+-+-+-+-+-+-+-+-+-+-+"
==============================================================================================================================
各位可能會有疑問說WSAD、跳與射擊跑到哪去了,其實這幾個指令我都丟到職業腳本去了,因為我的WSAD並沒有使用遊戲中預設的移動設定而是使用澳洲玩家povohat設計的無衝突移動指令,跳躍亦同是使用指令將跳與蹲綁在一起的蹲跳指令。
最後則是擺放我的畫質與網路參數設定、滑鼠設定、聲音設定、武器模組設定、抬頭顯示器設定等等的settings.cfg
畫質與網路參數設定是參考Chris's Maxframe fps config,什麼是fps config呢?顧名思義是降低畫質效果增進fps張數的設定檔,如果你的電腦不是非常夠力,或者是追求極致的技巧表現不希望任何lag讓你少拿一個Frag,那麼安裝fps config是你最好的選擇,不過換言之得到的就是極低的視覺效果享受,甚至是比遊戲設定手動調整的最低設定還低,畢竟fps config是專門為競技設計利用指令將不必要的效果去除來維持穩定的fps張數,沒有選手想在專心殺敵之餘還去享受旁邊會讓fps張數降低的漂亮風景。
如果你只是想for fun玩個遊戲,並不想把自己的遊戲搞到那麼絕的地步,但是又想利用設計屬於自己環境的概念來設計自己的CFG,Chris也有提供其他CFG,如高畫質的MaxQuality與HighQuality CFG,或者是中等畫質的HighFrames與DX9Frames CFG,不過最多人使用的就是Maxframes CFG,它是目前公認TF2中維持fps張數最好最穩定的CFG,甚至是比前期流行的m0re's fps config統計後平均多出20張fps左右。
其他如滑鼠設定、聲音設定、武器模組設定、抬頭顯示器設定等等的排版方式則是參考前歐洲職業玩家zerox的配置方式,我們直接來看settings.cfg內部,一些需要注意的地方我會做解說。
settings.cfg=========================================================================================================
// ------------
// NET SETTINGS
// ------------
cl_cmdrate "40"
cl_interp "0.025" // Change to 0.0375 for hitscan
cl_interp_ratio "1"
cl_lagcompensation "1"
cl_pred_optimize "2"
cl_smooth "0"
cl_smoothtime "0.01"
cl_updaterate "40"
rate "35000"
(存放網路參數設定的地方,Chris建議如果你常玩hitscan武器的話cl_interp盡量使用0.0375)
(hitscan:指非火箭、榴彈等等需要飛行時間的武器,如散彈槍)
(其實Chris還有提供另一串good connection的網路參數,不過我這裡是使用bad connection的,請依自己的網路需求調整)
// ------
// SPRAYS
// ------
// Enable sprays -- not enabled by default
cl_playerspraydisable "0"
r_decals "200"
r_spray_lifetime "2"
// Disable sprays -- DELETE THIS SECTION IF YOU WANT SPRAYS ENABLED
cl_playerspraydisable "1"
r_decals "0"
r_spray_lifetime "0"
(噴漆效果,預設是關閉,如須開啟將上面四行砍掉即可)
// -------
// SHADOWS
// -------
// Enable shadows -- not enabled by default
mat_shadowstate "1"
r_shadowmaxrendered "11"
r_shadowrendertotexture "0" // Set this to 1 for high definition shadows
r_shadows "1"
// Disable shadows -- DELETE THIS SECTION IF YOU WANT SHADOWS ENABLED
mat_shadowstate "0"
r_shadowmaxrendered "0"
r_shadowrendertotexture "0"
r_shadows "0"
(陰影效果,預設為關閉,開啟方式同上)
// ---------------
// FACIAL FEATURES
// ---------------
// Enable facial features -- not enabled by default
blink_duration "0.2"
r_eyes "1"
r_flex "1"
r_lod "1"
r_rootlod "1"
r_teeth "1"
flex_rules "1"
flex_smooth "1"
// Disable facial features -- DELETE THIS SECTION IF YOU WANT FACIAL FEATURES ENABLED
blink_duration "0"
r_eyes "0"
r_flex "0"
r_lod "2"
r_rootlod "2"
r_teeth "0"
flex_rules "0"
flex_smooth "0"
(臉部細部效果,預設是關閉,開啟方式同上)
// --------
// RAGDOLLS
// --------
// Enable ragdolls -- not enabled by default
cl_ragdoll_fade_time "15"
cl_ragdoll_forcefade "0"
cl_ragdoll_physics_enable "1"
g_ragdoll_fadespeed "600"
g_ragdoll_lvfadespeed "100"
ragdoll_sleepaftertime "5.0f"
// Disable ragdolls -- DELETE THIS SECTION IF YOU WANT RAGDOLLS ENABLED
//cl_ragdoll_fade_time "0"
//cl_ragdoll_forcefade "1"
//cl_ragdoll_physics_enable "0"
//g_ragdoll_fadespeed "0"
//g_ragdoll_lvfadespeed "0"
//ragdoll_sleepaftertime "0"
(屍體效果,預設是關閉,即敵人以非屍塊狀死亡後屍體會立即消失,在這裡我把他開啟了,所以你可以看到預設為關閉的指令那一區都被我註解,也就是讓系統忽略掉了,其效果跟砍掉是一樣的)
// ----
// GIBS
// ----
// Enable gibs -- not enabled by default
cl_phys_props_enable "1"
cl_phys_props_max "128"
props_break_max_pieces "-1"
r_propsmaxdist "1000"
violence_ablood "1"
violence_agibs "1"
violence_hblood "1"
violence_hgibs "1"
// Disable gibs -- DELETE THIS SECTION IF YOU WANT GIBS ENABLED
cl_phys_props_enable "0"
cl_phys_props_max "0"
props_break_max_pieces "0"
r_propsmaxdist "1"
violence_ablood "0"
violence_agibs "0"
violence_hblood "0"
violence_hgibs "0"
(屍塊效果,預設是關閉,開啟方式同上,即敵人是以屍塊狀方式死亡屍塊會立即消失)
// ---------------------------------------------------------------------------------------------------------------------------------
// END OF CUSTOMISATION
// ---------------------------------------------------------------------------------------------------------------------------------
// Cleaning up and stopping debug flooding
adsp_debug "0"
cl_clearhinthistory "1"
cl_debugrumble "0"
cl_rumblescale "0"
mat_debugdepthval "0"
mat_debugdepthvalmax "0"
mat_debug_postprocessing_effects "0"
// Graphical
cl_burninggibs "0"
cl_detaildist "0"
cl_detailfade "0"
cl_drawmonitors "0"
cl_ejectbrass "0"
cl_muzzleflash_dlight_1st "0"
cl_ragdoll_collide "0"
cl_show_splashes "0"
func_break_max_pieces "0"
glow_outline_effect_enable "0"
lod_transitiondist "0"
mat_aaquality "0"
mat_alphacoverage "0"
mat_antialias "1"
mat_autoexposure_max "0"
mat_autoexposure_min "0"
mat_bloomscale "0"
mat_bloom_scalefactor_scalar "0"
mat_bumpmap "0"
mat_colcorrection_disableentities "1"
mat_colorcorrection "0"
mat_compressedtextures "1"
mat_disable_bloom "1"
mat_disable_fancy_blending "1"
mat_disable_lightwarp "1"
mat_envmapsize "0"
mat_envmaptgasize "0"
mat_excludetextures "1"
mat_fastnobump "0"
mat_fastspecular "1"
mat_filterlightmaps "0"
mat_filtertextures "0"
mat_forceaniso "0"
mat_hdr_level "0"
mat_max_worldmesh_vertices "0"
mat_mipmaptextures "1"
mat_monitorgamma "2.0" // Controls brightness, try 1.8 to get it brighter or 2.2 to get it darker. Only works in fullscreen.
mat_motion_blur_enabled "0"
mat_non_hdr_bloom_scalefactor "0"
mat_parallaxmap "0"
mat_picmip "2"
mat_postprocess_x "0"
mat_postprocess_y "0"
mat_reducefillrate "1"
mat_reduceparticles "1"
mat_softwarelighting "0"
mat_software_aa_blur_one_pixel_lines "0"
mat_software_aa_strength "0"
mat_software_aa_strength_vgui "0"
mat_software_aa_tap_offset "0"
mat_specular "0" // Set to 1 for shiny ubers
mat_trilinear "0"
mat_wateroverlaysize "0"
mp_usehwmmodels "0"
mp_usehwmvcds "0"
muzzleflash_light "0"
rope_averagelight "0"
rope_collide "0"
rope_rendersolid "0"
rope_shake "0"
rope_smooth "0"
rope_smooth_enlarge "0"
rope_smooth_maxalpha "0"
rope_smooth_maxalphawidth "0"
rope_smooth_minalpha "0"
rope_smooth_minwidth "0"
rope_solid_maxalpha "0"
rope_solid_maxwidth "0"
rope_solid_minalpha "0"
rope_solid_minwidth "0"
rope_subdiv "0"
rope_wind_dist "0"
r_3dsky "0"
r_ambientboost "0"
r_ambientfactor "0"
r_ambientmin "0"
r_avglight "0"
r_bloomtintb "0"
r_bloomtintexponent "0"
r_bloomtintg "0"
r_bloomtintr "0"
r_cheapwaterend "1"
r_cheapwaterstart "1"
r_decalstaticprops "0"
r_decal_cullsize "0"
r_dopixelvisibility "0"
r_drawbatchdecals "0"
r_drawdetailprops "0"
r_drawflecks "0"
r_drawmodeldecals "0"
r_drawspecificstaticprop "0"
r_dynamic "0"
r_eyemove "0"
r_flashlightdepthtexture "0"
r_flashlightrendermodels "0"
r_flashlightrenderworld "0"
r_forcewaterleaf "1"
r_lightaverage "0"
r_maxdlights "0"
r_maxmodeldecal "0"
r_maxnewsamples "0"
r_maxsampledist "0"
r_minnewsamples "0"
r_physpropstaticlighting "0"
r_pixelfog "0"
r_radiosity "0"
r_renderoverlayfragment "0"
r_ropetranslucent "0"
r_staticprop_lod "4"
r_updaterefracttexture "0"
r_visualizeproplightcaching "1"
r_waterdrawreflection "0"
r_waterdrawrefraction "1"
r_waterforceexpensive "0"
r_waterforcereflectentities "0"
r_worldlights "0"
tf_particles_disable_weather "1" // Set to 0 to enable weather effects on maps like Viaduct and Sawmill
(上面這堆指令就是Chirs專業的地方,基本上如果你不懂指令的運作方式都不要去碰它)
Chirs maxframes fps config就到這裡為止
再來就是其他滑鼠設定、聲音設定、武器模組設定、抬頭顯示器設定等等,我不把這些設定另外再開個別CFG檔案來放是因為這些指令都很少,只要利用註解分類即可,可以個人化的地方我會解說。
// Misc
multicore " 1"
(多核心,1為開啟,0為關閉)
cl_predict "1"
cl_predictweapons "1"
cl_showfps "1" // Show unsmoothed FPS meter
(在遊戲右上方顯式fps張數,1為開啟,0為關閉)

fps_max "126" // For 75hz monitors try 150, for 85 try 170. If your computer can't handle that, cap it to your refresh rate + 1
(設定你的fps張數最高可以到多少,這裡跟你的螢幕更新率相關,螢幕更新率60Hz建議使用126,75Hz建議使用150,85Hz建議使用170)
● 為什麼fps張數會跟螢幕更新率有關係?因為螢幕更新率不夠時,fps張數過高會有破圖現象,譬如螢幕更新率60Hz時,fps張數超過60時則會有短暫破圖現象,要解決有兩種辦法,一種是開啟垂直同步使fps張數不超過螢幕更新率,但是會限制住fps張數,另一種辦法就是購買螢幕更新率高像是可以到120Hz的螢幕
● 為什麼fps張數會跟螢幕更新率有關係?因為螢幕更新率不夠時,fps張數過高會有破圖現象,譬如螢幕更新率60Hz時,fps張數超過60時則會有短暫破圖現象,要解決有兩種辦法,一種是開啟垂直同步使fps張數不超過螢幕更新率,但是會限制住fps張數,另一種辦法就是購買螢幕更新率高像是可以到120Hz的螢幕
傳統CRT螢幕更新率往往可以到120Hz,而液晶螢幕擁有120Hz更新率的則很少,這就是為什麼很多職業玩家偏好使用CRT的原因。
cl_showpluginmessages "0"
// Performance
cl_forcepreload "1" // Preloads maps, may cause a few seconds more loading the map at the benefit of a more consistent FPS (because the whole map is preloaded)
cl_soundemitter_flush "1"
m_rawinput "1" // Uncomment to enable raw mouse input -- DO NOT ENABLE IF YOU ARE USING XFIRE OVERLAY
(rawinput,1為開啟,0為關閉)
● rawinput的概念基本上只是跳過作業系統控制台裡的滑鼠靈敏度,如果將其開啟,控制台的靈敏度不管多少,遊戲會將其視為預設,也就是6
 |
| 控制台滑鼠靈敏度 |
mat_bufferprimitives "1"
mat_clipz "1" // FX owners should set this to 0
mat_disablehwmorph "0"
mat_disable_ps_patch "1"
mat_forcehardwaresync "0"
mat_forcemanagedtextureintohardware "0"
mat_framebuffercopyoverlaysize "0"
mat_levelflush "0"
mat_maxframelatency "0"
mat_postprocessing_combine "1"
mat_vsync "0"
r_fastzreject "-1" // Some ATI cards aren't autodetected, if you know that your card supports it, try setting it to 1.
r_hunkalloclightmaps "0"
r_lightcache_zbuffercache "0"
r_occlusion "1"
r_unloadlightmaps "0"
soundscape_flush "1"
// Sound
dsp_enhance_stereo "0"
dsp_slow_cpu "1"
snd_async_fullyasync "1" // Can help stop freezes and sound looping
snd_pitchquality "0"
snd_spatialize_roundrobin "1"
// Threading
cl_threaded_bone_setup "0"
cl_threaded_client_leaf_system "0"
mat_queue_mode "-1"
r_threaded_client_shadow_manager "1"
r_threaded_particles "1"
r_threaded_renderables "1"
r_queued_decals "0"
r_queued_post_processing "0"
r_queued_ropes "1"
sv_cheats "0"
//____________________________________________________________________
// crosshair settings
//
//crosshair "1"
//cl_crosshaircolor "0"
//cl_dynamiccrosshair "1"
//cl_scalecrosshair "1"
//cl_crosshairalpha "200"
//cl_observercrosshair "1"
//cl_crosshair_red "0.000000"
//cl_crosshair_green "255.000000"
//cl_crosshair_blue "0.000000"
//cl_crosshair_file "crosshair5"
//cl_crosshair_scale "16.000000"
(如果你是使用遊戲中單一樣式準星的話可以在這裡編輯你的準星,不過我有使用準星交換器,所以這邊都被我註解掉了)
(如果你是使用遊戲中單一樣式準星的話可以在這裡編輯你的準星,不過我有使用準星交換器,所以這邊都被我註解掉了)
//____________________________________________________________________
// mouse
//
m_pitch "0.022" //.022// Vertical mouse axis speed. Negative value is inverted Y.
m_filter "0" // 0 // Mouse filtering (set this to 1 to average the mouse over 2 frames).
sensitivity "2.4" // 450dpi
(滑鼠靈敏度)
m_rawinput "1"
zoom_sensitivity_ratio "1" // 1 // Multiplier of sensitivity setting while zoomed in with Sniper Rifle.
(狙擊鏡開啟後滑鼠靈敏度會以多少的倍率呈現,1就是X1,也就是不變)
m_side "0.8"
m_yaw "0.022"
m_pitch "0.022"
m_forward "1"
m_customaccel "0"
m_customaccel_scale "0.00" //0.04*
m_customaccel_max "0"
m_customaccel_exponent "0" //1*
m_mouseaccel1 "0"
m_mouseaccel2 "0"
(將這些指令數直接設為0徹底去除滑鼠加速度)
● 滑鼠加速度一直以來都是困擾著射擊遊戲玩家的問題,其概念就是當滑鼠加速度開啟時,滑鼠移動速度越快在桌面就是鼠標,在遊戲中就是準星,畫面上所移動的距離會隨著移動速度增加,這麼一來雖然滑鼠移動相同的距離,但由於速度的不同會使鼠標或者是準星在不同的地方,這在講求準度的射擊遊戲中是非常嚴重的事情,影響滑鼠加速度的因子有很多,指令,啟動選項,滑鼠驅動程式,控制台,滑鼠硬體本身等等,這裡先用指令嘗試將滑鼠加速度去除,控制台的地方去除則是取消增強指標的準確性,滑鼠驅動則要看每隻滑鼠的不同而決定,而硬體本身的問題除非換一隻不會偷加速的滑鼠以外則是無解,啟動選項在後面談到時會做解說。
|
| 取消增強指標的準確性 |
m_mousespeed "1"
cl_mouselook "1"
cl_idealpitchscale "0.8"
//____________________________________________________________________
// movement
//
lookspring "0"
lookstrafe "0"
option_duck_method "1"
cl_anglespeedkey "1.5" //off*
cl_pitchspeed "26562" //off*
cl_yawspeed "140" //off*
//____________________________________________________________________
// weapon settings
//
cl_flipviewmodels "0"
cl_autoreload "1"
(自動補彈,1為開啟,0為關閉)
cl_autorezoom "1"
cl_ejectbrass "0" // 1 // If set to 1, weapons eject shells as they fire.
cl_muzzleflash_dlight_1st "0" //disables your own muzzle flash
(武器爆擊發光效果,1為開啟,0為關閉)
muzzleflash_light "1" // 1 // Shows muzzle flash (doesn't seem to do anything).
tf_medigun_autoheal "1"
tf_remember_activeweapon "0"
tf_remember_lastswitched "0"
ifm_steadycam_rotaterate "60"
ifm_steadycam_zoomspeed "1.0"
ifm_steadycam_zoomdamp "0.95"
ifm_steadycam_armspeed "0.5"
ifm_steadycam_rotatedamp "0.95"
ifm_steadycam_mousefactor "1.0"
ifm_steadycam_mousepower "1.0"
ifm_steadycam_2dspringconstant "33.0"
ifm_steadycam_2ddragconstant "11.0"
ifm_steadycam_noise "0.0"
ifm_steadycam_sensitivity "1.0"
mp_decals "50" // 200// Number of visible weapon decals to be shown at once.
showhitlocation "1"
r_drawviewmodel "1"
(繪製武器模組,1為開啟,0為關閉)
viewmodel_fov "100"
(武器模組顯示距離多寡)
(武器模組顯示距離多寡)
fov_desired "90.000000"
(遊戲視野)
(遊戲視野)
//____________________________________________________________________
// HUD
//
cl_hud_minmode "1"
(使用簡化版抬頭顯示器,1為開啟,0為關閉)
(使用簡化版抬頭顯示器,1為開啟,0為關閉)
cl_chatfilters "63"
hud_takesshots "0"
hud_draw_fixed_reticle "0"
hud_classautokill "1" // 0 // Automatically kill player after choosing a new playerclass.
hud_deathnotice_time "6" // 6 // Amount of seconds divided by 2 that obituary messages involving you are shown (Example: 10 = 20 seconds)
hud_fastswitch "1" // 0 // Disable HL2 style weapon selection to immediately select weapons when slot keys are pressed.
(快速切換武器,1為開啟,0為關閉)
(快速切換武器,1為開啟,0為關閉)
tf_build_menu_controller_mode "0"
tf_disguise_menu_controller_mode "0"
tf_weapon_select_demo_start_delay "1.0"
tf_colorblindassist "0"
tf_weapon_select_demo_time "0.5"
tf_hud_notification_duration "3" // 3 // How long to display hud notification panels before fading them.
tf_hud_num_building_alert_beeps "2" // 2 // Number of times to play warning sound when a new alert displays on building hud objects
spec_scoreboard "1"
overview_health "1"
overview_names "1"
overview_tracks "1"
overview_locked "1"
overview_alpha "1.0"
jpeg_quality "100"
hud_combattext "1"
//____________________________________________________________________
// ui settings
//
scene_showlook "0"
scene_showmoveto "0"
scene_showunlock "0"
scene_showfaceto "0"
vgui_message_dialog_modal "1" //0
cl_spec_mode "4"
closecaption "0"
//____________________________________________________________________
// sound settings
//
volume "1"
snd_musicvolume "1.000000"
snd_legacy_surround "0.1"
snd_mixahead "0.1" // 0.1// Set between 0 and 1, the higher the value the less stuttering and more synchronized sound will be, but performance may be reduced.
snd_pitchquality "1" // 1 // Enables pitch quality (unknown).
snd_surround_speakers "2" // -1 // Forces surround sound output. 0=headphones 2=stereo 4=quad 5=5.1 surround 7=7.1 surround... Any other value including -1=stereo.
voice_modenable "1"
voice_enable "1"
voice_scale "1"
voice_forcemicrecord "1"
voice_overdrive "2" // 2 // Amount of volume to duck when someone talks over in game voice.
sv_voiceenable "0"
commentary "0"
commentary_firstrun "0"
cl_soundfile "sound/player/jingle.wav"
dsp_slow_cpu "1" // 0 // If set to 1, reduces the quality of dsp sound effects.
snd_async_fullyasync "0"
snd_duckerattacktime "0.5"
snd_duckerreleasetime "2.5"
snd_duckerthreshold "0.15"
snd_ducktovolume "0.55"
snd_mixahead "0.1"
snd_noextraupdate "0"
snd_profile "0"
suitvolume "0"
dsp_enhance_stereo "0"
dsp_spatial "40"
dsp_speaker "50"
dsp_volume "2"
dsp_water "14"
tf_dingaling_volume "1.2"
tf_dingaling_pitchmindmg "130"
tf_dingaling_pitchmaxdmg "50"
tf_dingaling_wav_override "quakehit.wav"
tf_dingalingaling "0"
(擊中敵人音效,1為開啟,0為關閉)
● 在TF2中擊中敵人的音效其實是可以修改的,只要在team fortress 2\tf\sound中放置與tf_dingaling_wav_override中檔名與副檔名一致的檔案即可,不過由於在sv_pure值為2不允許任何客製化設定的伺服器中無法使用,實用性有限。
● 如何突破sv_pure的限制來更改擊中敵人音效呢,答案是將你想要的音效檔命名為hitsound並放入tf/sound/ui中就可以了,感謝Zuoan提供此方法。
(擊中敵人音效,1為開啟,0為關閉)
● 在TF2中擊中敵人的音效其實是可以修改的,只要在team fortress 2\tf\sound中放置與tf_dingaling_wav_override中檔名與副檔名一致的檔案即可,不過由於在sv_pure值為2不允許任何客製化設定的伺服器中無法使用,實用性有限。
● 如何突破sv_pure的限制來更改擊中敵人音效呢,答案是將你想要的音效檔命名為hitsound並放入tf/sound/ui中就可以了,感謝Zuoan提供此方法。
//____________________________________________________________________
// directX 9.0 settings
//
//mat_bumpmap "1"// If set to 1, enables bump mapping which makes flat 2D textures appear three dimensional. Setting this to 0 will cause everyone to have a white shine on them.
//mat_picmip "1"//Sets texture quality. Is the same as the "Texture Detail" menu. Values are 0-High, 1-Medium, 2-Low.
//mat_specular "0"//Enable/Disable specularity for performance testing. Will cause a material reload upon change.
//r_pixelfog "1"//set to 1 can disable strange fog while using dxlevel90 with fpscfg.
//____________________________________________________________________
// directX 8.1 settings
//
//mat_bumpmap "0"// If set to 1, enables bump mapping which makes flat 2D textures appear three dimensional. Setting this to 0 will cause everyone to have a white shine on them.
//mat_picmip "2"//Sets texture quality. Is the same as the "Texture Detail" menu. Values are 0-High, 1-Medium, 2-Low.
//mat_specular "0"//Enable/Disable specularity for performance testing. Will cause a material reload upon change.
//r_pixelfog "0"//set to 1 can disable strange fog while using dxlevel90 with fpscfg.
(Chris maxframes fps config是專門設計給DirectX 8.0或者是8.1的設定下使用的,其中DirectX等級
可以在啟動選項中調整,如果需要在DirectX 9.0使用,除了另外使用Chris DX9 config,另一個選擇就是微調以上設定)
(由於之前TF2在DirectX 8.0與8.1中是不允許顯示油漆過後帽子顏色的,不過在某次更新後已經可以顯示,在那之前本人就無聊去研究了一下如何在DirectX 9.0下顯示帽子顏色來跑maxframes fps config)
(Chris maxframes fps config是專門設計給DirectX 8.0或者是8.1的設定下使用的,其中DirectX等級
可以在啟動選項中調整,如果需要在DirectX 9.0使用,除了另外使用Chris DX9 config,另一個選擇就是微調以上設定)
(由於之前TF2在DirectX 8.0與8.1中是不允許顯示油漆過後帽子顏色的,不過在某次更新後已經可以顯示,在那之前本人就無聊去研究了一下如何在DirectX 9.0下顯示帽子顏色來跑maxframes fps config)
echo
echo "+-+-+-+-+-+-+-+-+-+-+-+-+-+-+-+-+-+-+-+-+"
echo "+-+-+-+-+-+-+-+-+-+-+-+-+-+-+-+-+-+-+-+-+"
echo "settings.cfg loaded |"
echo "+-+-+-+-+-+-+-+-+-+-+-+-+-+-+-+-+-+-+-+-+"
echo "+-+-+-+-+-+-+-+-+-+-+-+-+-+-+-+-+-+-+-+-+"
這麼一來settings.cfg存放我的畫質與網路參數設定、滑鼠設定、聲音設定、武器模組設定、抬頭顯示器設定等等,otherbinds.cfg存放我的鍵盤按鍵設定,然後由主程式autoexec.cfg執行,配合職業腳本,大致上屬於我自己的CFG就有一個主體了。
●最後在這裡解說我的CFG中有使用到的一些實用指令與工具。
//duckjump
alias +dj "+duck;+jump"
alias -dj "-jump;-duck"
蹲跳指令:就是一個基本的使用指令將跳與蹲綁在一起的蹲跳指令
在需要使用到蹲跳的職業中令空白鍵為蹲跳的方法則是在其職業腳本中加上以下指令
bind SPACE +dj
// Null-cancelling movement script
// (prevents you from pressing two opposing directions, which causes you to stop moving)
alias +mfwd "-back;+forward;alias checkfwd +forward"
alias +mback "-forward;+back;alias checkback +back"
alias +mleft "-moveright;+moveleft;alias checkleft +moveleft"
alias +mright "-moveleft;+moveright;alias checkright +moveright"
alias -mfwd "-forward;checkback;alias checkfwd none"
alias -mback "-back;checkfwd;alias checkback none"
alias -mleft "-moveleft;checkright;alias checkleft none"
alias -mright "-moveright;checkleft;alias checkright none"
alias checkfwd none
alias checkback none
alias checkleft none
alias checkright none
alias none ""
無衝突移動:由povohat設計,各位可以在遊戲中試試看,在TF2中預設的移動中,"如果將兩個反方向的按鍵(例如左與右)先觸發一方,在不放開的狀態下在觸發另一方,會發現在遊戲中的移動會呈現靜止不動",如果在激烈的纏鬥中,你的走位突然停止不動下場會怎樣大家應該都很清楚,由其是scout vs scout的情形下,專職scout的povohat發現了這個情形,於是設計了無衝突移動指令,其差別就在於"先觸發一方,在不放開的狀態下在觸發另一方,其呈現的移動並非靜止而是往後觸發的那一方移動"。
白話來說就是如果你先按住右不放開再按左,則人物並非像預設的移動是靜止而是往左移動。
在需要用到無衝突移動的職業令WSAD為無衝突移動的方法則是在其職業腳本中加上以下指令
bind w +mfwd
bind s +mback
bind a +mleft
bind d +mright
==============================================================================================================================
這麼一來settings.cfg存放我的畫質與網路參數設定、滑鼠設定、聲音設定、武器模組設定、抬頭顯示器設定等等,otherbinds.cfg存放我的鍵盤按鍵設定,然後由主程式autoexec.cfg執行,配合職業腳本,大致上屬於我自己的CFG就有一個主體了。
●最後在這裡解說我的CFG中有使用到的一些實用指令與工具。
//duckjump
alias +dj "+duck;+jump"
alias -dj "-jump;-duck"
蹲跳指令:就是一個基本的使用指令將跳與蹲綁在一起的蹲跳指令
在需要使用到蹲跳的職業中令空白鍵為蹲跳的方法則是在其職業腳本中加上以下指令
bind SPACE +dj
// Null-cancelling movement script
// (prevents you from pressing two opposing directions, which causes you to stop moving)
alias +mfwd "-back;+forward;alias checkfwd +forward"
alias +mback "-forward;+back;alias checkback +back"
alias +mleft "-moveright;+moveleft;alias checkleft +moveleft"
alias +mright "-moveleft;+moveright;alias checkright +moveright"
alias -mfwd "-forward;checkback;alias checkfwd none"
alias -mback "-back;checkfwd;alias checkback none"
alias -mleft "-moveleft;checkright;alias checkleft none"
alias -mright "-moveright;checkleft;alias checkright none"
alias checkfwd none
alias checkback none
alias checkleft none
alias checkright none
alias none ""
無衝突移動:由povohat設計,各位可以在遊戲中試試看,在TF2中預設的移動中,"如果將兩個反方向的按鍵(例如左與右)先觸發一方,在不放開的狀態下在觸發另一方,會發現在遊戲中的移動會呈現靜止不動",如果在激烈的纏鬥中,你的走位突然停止不動下場會怎樣大家應該都很清楚,由其是scout vs scout的情形下,專職scout的povohat發現了這個情形,於是設計了無衝突移動指令,其差別就在於"先觸發一方,在不放開的狀態下在觸發另一方,其呈現的移動並非靜止而是往後觸發的那一方移動"。
白話來說就是如果你先按住右不放開再按左,則人物並非像預設的移動是靜止而是往左移動。
在需要用到無衝突移動的職業令WSAD為無衝突移動的方法則是在其職業腳本中加上以下指令
bind w +mfwd
bind s +mback
bind a +mleft
bind d +mright
準星交換器:由broesel設計,基本上就是一個腳本讓你可以在不同職業,不同武器,擁有不同樣式、大小、顏色的準星,與不同的模組顯示距離(viewmodel_fov)。
下載下來後會有一個包含binds.cfg、crosshairs.cfg、defaultcrosshair.cfg、disable-crosshairswitcher.cfg、settings.cfg、switcher.cfg的資料夾crosshairswitcher與職業腳本,其中職業腳本的功用在於執行個別職業的準星設定。
例如scout的執行就是用exec crosshairswitcher/switcher; scout來呼叫,如果你原本的職業腳本有你原本的東西,只要把各職業呼叫準星交換器的指令一一貼上原本的職業腳本即可。
binds.cfg可以自己設計按鍵設定,crosshairs.cfg可以自己設計準星樣式顏色與大小,和武器顯示模組距離,settings.cfg則是準星交換器的主要個人設計的地方,我就拿其中一部份來解說。
alias scout_primary "tiny; green;cross; 100"
(這串指令代表的就是切換到scout主武器時,準星為小,綠色,十字,且武器模組顯示距離為100)
其實broesel都有在各cfg中做註解解說,我想其實不難理解。
啟動選項(SteamLaunchOptions)

除了CFG,所有的Source引擎遊戲還可以透過Steam啟動選項參數來設定自己的遊戲環境,啟動選項的參數總數有非常多,但實用的通常就是那幾個,這裡就介紹一些基本需要用到的參數。
-novid :取消遊戲啟動時的Valve進場動畫,減化遊戲啟動時間
-nosync :取消Steam同步功能,增進遊戲效能
-nojoy :取消搖桿追蹤功能,增進遊戲效能
-noforcemparms ┐
-noforcemaccel ─ :三個取消滑鼠加速度參數
-noforcemspd ┘
-w :遊戲解析度寬度,例如輸入-w 1680則遊戲解析度寬度會呈現1680
-h:遊戲解析度高度,例如輸入-w 1050則遊戲解析度高度會呈現1050
-dxlevel :DirectX等級,基本上常用的數值為-dxlevel 80 -dxlevel 81 -dxlevel 90,通常大部分fps config都會搭配等級較低的DirectX等級如-dxlevel 80與-dxlevel 81使用,用意是降低顯示的負擔增進效能。
-heapsize :記憶體指派參數,藉由此參數指派相當的數量的記憶體可以增進些許遊戲效能,不過指派過多或者指派過少反而會降低遊戲效能,各種記憶體的大小所需指派的heapsize可參考下表:
// * 512MB System Memory: -heapsize 262144
// * 1GB System Memory: -heapsize 524288
// * 2GB System Memory: -heapsize 1048576
以此類推
-windowed :使遊戲視窗化
-noborder :使視窗化之遊戲去邊,只要將-w -h -windowed -noborder四個參數搭配得宜,就能呈現出無邊框視窗化版本的全螢幕,選擇視窗化的原因是Alt+Tab能夠更快速的跳出遊戲外,特別是在使用語音軟體溝通時更加方便。
抬頭顯示器(HeadUpDisplay)
 |
| 分辨得出除了地圖差異外,還有一個最大的差異在哪嗎? |
雖然TF2中預設的HUD已經有提供最小HUD功能盡量來符合競技需求,但在事事講求表現的競技模式下,預設HUD似乎有太多不必要的元素,於是自訂HUD在競技模式玩家中的佔有率往往是比預設HUD還來的高。
自訂HUD的特色通常是簡潔,清楚的表示該表示的東西,讓你可以非常清楚的觀察自己在戰場上的狀況,沒有任何花俏的設計,自訂HUD的數量琳瑯滿目,以下是目前TF2上最受歡迎的幾個自訂HUD,通常作者會提供一些screenshots或影片來給未使用過的玩家們先參考他們自訂HUD的長相,各位可以都可以在這些熱門的自訂HUD中挑選一個中意的來使用,本人是使用broeselhud,順便也特別拿broeselhud來解說一些使用自訂HUD需要注意的地方,通常自訂HUD的檔案修改與擺放方式都大同小異。
自訂HUD的特色通常是簡潔,清楚的表示該表示的東西,讓你可以非常清楚的觀察自己在戰場上的狀況,沒有任何花俏的設計,自訂HUD的數量琳瑯滿目,以下是目前TF2上最受歡迎的幾個自訂HUD,通常作者會提供一些screenshots或影片來給未使用過的玩家們先參考他們自訂HUD的長相,各位可以都可以在這些熱門的自訂HUD中挑選一個中意的來使用,本人是使用broeselhud,順便也特別拿broeselhud來解說一些使用自訂HUD需要注意的地方,通常自訂HUD的檔案修改與擺放方式都大同小異。
- broeselhud (updated m0re's HUD, previously known as michaelll-hud): Official site – Screenshots – Download
- Flame's Community HUD: Official site – Screenshots – Download
- FrankenHUD: Official site – Screenshots – Download
- G-Mang HUD: Official site – Screenshots – Download
- M0rehud: Official site – Screenshots – Download
- Oxide HUD: Official site – Screenshots – Download
- PVHUD: Official site
- Revan XP HUD: Official site – Screenshots – Download
- Toasty HUD: Official site – Screenshots – Download
- Tranky MixtureHUD: Official site – Screenshots – Download
- e.v.e HUD: Official site – Screenshots – Download
- Garm3e HUD: Official site
以下Q&A皆以broeselhud為主,不過我說過通常自訂HUD的檔案修改與擺放方式都大同小異。
● 如何將6VS6計分板改成大型的12VS12計分板?
 |
| 6VS6計分板 |
 |
| 12VS12計分板 |
自訂HUD的檔案中必定包含三個資料夾要安裝在team fortress 2\tf路徑底下,也就是materials、scripts、resource,其中記分板的檔案在resource\ui路徑底下的兩個ScoreBoard.res與ScoreBoard_Pub.res,如將6VS6計分板改成大型的12VS12計分板只要將ScoreBoard.res砍掉並且把ScoreBoard_Pub.res改名成ScoreBoard.res即可。
● 我所使用的自訂HUD有彈藥不足警示功能,但是在遊戲中怎麼好像沒效?
 |
| 彈藥不足警示 |
可能你所使用的自訂HUD跟broeselhud一樣預設是將彈藥不足警示功能關閉的,只要到tf\scripts底下的HudAnimations_tf.txt中會發現彈藥不足警示功能是被註解(關閉)的,只要將註解去掉即可。
 |
| HudAnimations_tf.txt中的彈藥不足警示功能區塊 |
● 常常可以看到有許多玩家在玩TF2時射擊牆面產生彈孔時不會有碎石噴出的效果,這是怎麼做到的呢?
Well,這又要再一次請到澳洲神人povohat,這些效果是由他研發的surfaceproperties.txt產生的,主要用意一樣是為了降低顯示負擔增進效能與fps張數,使用方式就是將他提供的surfaceproperties.txt丟到tf\scripts底下就可以了。
● 為什麼TF2更新過後自訂HUD往往會被打亂?
如果你的自訂HUD更新過後會被打亂,crashed,只需要把materials、scripts、resource砍掉後再一次把自訂HUD的materials、scripts、resource丟進team fortress 2\tf路徑底下即可,如遇到大更新時此方法也不可行,就只能等待作者上傳新版本上來。
結語
以上這些教學保證不包含作弊的成份,更不會被VAC banned,因為並沒有使用非法的外部程式來修改遊戲,全部都只是使用Valve所允許的指令來調整遊戲讓遊戲更符合競技需求而已。
最後,如果你在摸索的過程有任何不中意想要復原的時候,任何時刻都可以把materials、scripts、resource三個資料夾砍掉,啟動選項砍掉,CFG檔案全部砍掉,並且在啟動選項輸入參數-autoconfig後啟動遊戲來回復預設設定。
那個彈藥不足,我看不出來有那裡不依樣.....
回覆刪除不會顯示不足的紅字..
可以幫我復原成原來的樣子嗎你教得我看不懂
回覆刪除請問為什麼我的畫面會變得暗沉跟武器上的花紋都模糊掉
回覆刪除為甚麼我TF2 的水面無法返色 只會顯示白色
回覆刪除